A couple of our good friends came round about lunch time to help us decorate our living room up with anything spotty/Pudsey related. We printed off loads of pictures of Pudsey and the Children in Need logo and stuck them around the room (ok so we did the door and most of the other sticking was done by my friend)!
They ended up all over the other wall too and even stuck to our hideous fire (too hideous to even show you a picture)!
We also had quite a lot of help blowing up balloons and (very prettily I think you'll agree) stringing them up across the fire and along the window
Finally we also made some tissue paper pom poms. I found these on another blog and thought that they'd be perfect for the spots theme of Children in Need. They are so simple but really effective. I'll try to run through how we made them (please excuse that the photos look like the tissue paper changes colours part way through - I didn't take photos of all of the steps on one pom pom)
Firstly layer 10 sheets of tissue paper on top of each other in a stack (as neatly as you can). I think the sheets that we used were about A1 size and as you can see they make pretty dramatically huge pom poms - I'm sure if you reduce the size of the sheets and maybe the number that you use then you could make smaller ones - I think I might give this a go with all white paper near Christmas and try to make a snowman. Anyway we were stacking paper:
Fold the tissue concertina style all the way along - I left about an inch between each fold line. Again I guess maybe less with smaller sheets:
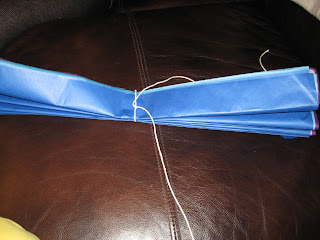
Tie some string around the middle leaving the ends long enough to hang the pom pom later:
Shape the ends - we made a few and shaped all of the ends differently so just experiment - it depends which look you want to go for:
Unfold the sheets into a kind of giant bow tie shape:
And then start to separate the layers - be careful to make sure that the first one you pull out as far as you can and also try not to rip the tissue paper (it is very thin and my finger nails ended up going through it a few times):
Once you have done about half of them it should look something like this:
This is when it gets quite tricky and you could do with a second person to help as I did - you either have to dangle it in mid air to try to separate the sheets on the other side or try to balance it carefully without crushing the side that you have just separated. When they are all separated they should look something like this - we experimented with a few different colour combinations. A nice tasteful blue-y coloured one (we forgot to shape the edges on this one):
All of the bright pinks, oranges and yellows - with spiky ends (just cut the concertina at a diagonal):
And a couple with totally random combinations (with inward curved edges):
(And outward curved edges):
All in all I think they looked pretty good and worked well for the spotty theme.
We had a really lovely evening with our friends and raised a little bit of money too with the help of the change pudsey that we printed from the internet (everyone donated some change to stick on Pudsey). We haven't counted it yet but I think there will be a few pounds.


No comments:
Post a Comment